Creating a bust; step by step
|
|
|
Creating a bust; step by step |
|
 |
 |
 |
Menu page | |
| Previous page | |||||
| Preliminary work | |||||
| Schedule a presentation | |||||
| Sketch page | |||||
| Let's draw | |||||
| Image 1 | Image 2 | Image 3 | Image 4 | ||
|
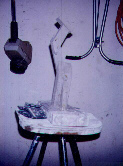
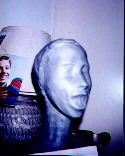
A bust starts with an
armature as seen in image 1. The armature is designed to support the
sculpture. Notice that the armature was built to the tilt of the head of
the final product.
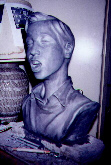
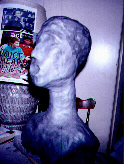
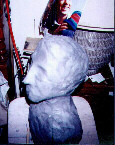
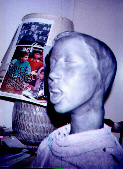
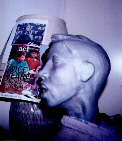
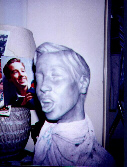
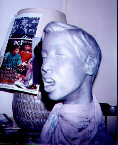
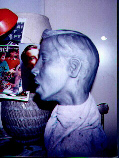
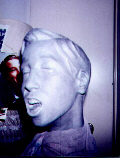
In image 2, the process of building up the clay begins. You can see this process continuing through image three and four. As the clay is built up, I begin establishing the position of basic features such as the nose, eye sockets and mouth. Notice that I have already established that the mouth will be open |
|||||
 |
 |
 |
 |
||
| Image 5 | Image 6 | Image 7 | Image 8 | ||
|
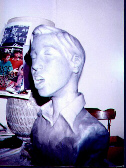
In image five and six, I am trying to establish the shape of the head and the position of general features. I do not want to attempt to do detail here. I keep my mind loose and creative. It is in this phase that the art comes to life. If I focus on detail at this time, I lose creativity and become more analytical in my thinking. You can see where I have loosely established the hairline. Notice I am beginning to build up the neck muscles in image 5.
In image 7, I am satisfied with the shape of the head and begin to nail down the detail and features of the face. I still keep my mind loose and don't want to get too analytical at this time. I keep a wet towel around the shoulders to keep the clay from drying out. Depending on the circumstances, I may maintain a large hole in the top of the head into which I pour water from time to time. It's important to keep the clay moist. I prefer to work in a cool and humid place.
This bust, unlike the others, was done in my bedroom. I was under a tight schedule to finish it so my bedroom turned out to be the best place for me to work. I don't feel creative all the time but some times I feel creative at the strangest times. I wanted to be able to work on it if I felt creative in the middle of the night. I have to work when the creative feeling is there. |
|||||
 |
 |
 |
 |
||
| Image 9 | Image 10 | Image 11 | Image 12 | ||
|
I use different techniques on each bust depending on whether I have a live subject to work from or photos. In the case of this bust I used photos. Sometimes this calls for some clever methods to achieve accuracy. Notice that I have only one eye developed in image nine. Usually, I develop both eyes at the same time but since I was working from photos I had to accept what the photos gave me.
I choose to develop the best eye that I could see from the photos and create the second eye from the first. I also used mirrors to compare the muscles of my own face to the sculpture. I choose to develop the image from a public speaking tour that Craig was on. I worked hard to capture his matter-of-fact facial expressions. I spent a lot of time copying Craig's facial expressions in the mirror.
|
|||||
 |
|
 |
 |
||
| Image 13 | Image 14 | Image 15 | Image 16 | ||
|
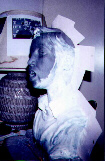
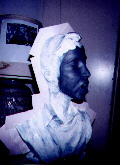
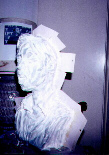
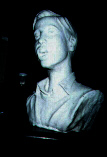
In image 9 through 14 I switched from a creative mode of thinking to a more analytical and detailed mindset. I must stress the importance of not thinking detail until I have brought my creative thinking to its fullest. This keeps me from forming lopsided creations that are difficult to complete because of errors that I induced from being too analytical in the early development. Image 14 shows the completed sculpture. In image 15 through 18 I begin the process of building up a layer of latex which will become the mold for the final sculpture. Image 19 shows the final sculpture after it has been cast. |
|||||
 |
 |
 |
|||
| Image 17 | Image 18 | Image 19 | |||
|
|
|||||
| Contact Us | Home | Menu page | Back | Preliminary work |
Copyright © 2003 Schambres Productions