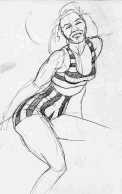
|
We begin by
looking at the photo from which the sketch was derived
in Picture 1 after which, we see the final sketch in
Picture 2. If you look
closely in Picture 3, you will see the guidelines of the
girl's frame drawn very lightly. I have
highlighted those guidelines in Picture 4. Click on
any
picture to see a larger image. Practice
making your initial guidelines as light as possible.
They should be barely visible to your eyes.
Remember they are only guidelines and will not be a part
of the final drawing. If they need to be erased
later it will be easier to do so and will make a cleaner
drawing if the guidelines are drawn in lightly.
Sometimes I
draw my guidelines so lightly that I do not erase them
later but rather, I may use them as part of something in
the final picture. Other times, the final shading
may cover them up. It is always best to use the
eraser as little as possible. In picture 3,
you can see the actual initial guidelines. I have
purposely darkened them here so that that you can see
that the initial guideline takes on the same pose as the
final drawing. The initial guideline should show
action. It is the real life of the the picture.
If the guideline does not come alive, then most likely,
the final picture will not either. |
|
Once you are
satisfied with the positioning of the figure and it's
dimensions, you can begin detailing the figure.
This stage is like connecting the dots only in reality
you are connecting the shapes. Here, you will make
your figure resemble the original and begin the process
of adding the details. As you connect the shapes,
you must always be aware to make those shapes show
depth and dimension.
Notice the
dotted lines on Picture 8. I noticed that I
did not draw in the left arm correctly and was not aware
of its true shape and position as most of it is hidden
by the body. The dotted lines show the correction
for the left arm. Notice also that even though a
part the figure will not be seen in the finished drawing
it is always good to lightly sketch it in so that you
can keep the visible parts of that element in proper
perspective. Picture 9 shows the completed
drawing with the stripes added. Make sure that the
stripes follow the contours of the body. If done
correctly, it is the stripes that add so much to the
effect of depth and dimension to this drawing.
Examine the striped ball and vase examples in section
one. |